How to Change Address in Aadhaar Card – Complete Step-by-Step Guide (2026)
You can change your address in Aadhaar Card using two official methods. The first is the online method through the myAadhaar portal at myaadhaar.uidai.gov.in, which requires a registered mobile number and a valid Proof of Address document. The second is the offline method by visiting any authorised Aadhaar Enrolment Centre in person. If you do not have a valid address proof document, UIDAI also provides an Address Validation Letter method for residents who cannot submit standard documents.
As per UIDAI, there is no lifetime limit on the number of times you can update your address in Aadhaar. You can update it whenever you move to a new location.
Source: All information in this article is based on official UIDAI guidelines at uidai.gov.in.
Why You Should Keep Your Aadhaar Address Updated
Your Aadhaar card address is used by banks, government departments, telecom operators, and other services for identity and address verification. If your address in Aadhaar is outdated, it can cause problems during KYC, loan applications, subsidy disbursements, and passport applications.
Common reasons people update their Aadhaar address include:
- Moved to a new rented house or flat in the same or a different city
- Bought a new property and shifted in
- Relocated for work or education
- Spelling mistake in the address recorded during original enrolment
- Changed address after marriage
- Permanent relocation to a different state
All Three Methods to Change Aadhaar Address
| Method | Best For | Mobile Number Required | Document Required | Fee |
|---|---|---|---|---|
| Online via myAadhaar Portal | Users with registered mobile and valid address proof | Yes | Yes, valid PoA | Free until 14 June 2026 |
| Offline at Enrolment Centre | Users without registered mobile or who prefer in-person | Not required | Yes, valid PoA | Rs 75 |
| Address Validation Letter | Users who do not have any valid address proof document | Yes | No standard PoA needed | Free until 14 June 2026 |
Documents Required to Change Aadhaar Address
You need to submit one valid Proof of Address document. The document must clearly show your name and the new address. The name on the document must match the name recorded in your Aadhaar. UIDAI accepts the following documents for address update:
- Passport
- Bank Statement or Passbook with address
- Post Office Account Statement or Passbook
- Ration Card
- Voter ID Card
- Driving Licence
- Government-issued Photo ID with address
- Electricity Bill not older than 3 months
- Water Bill not older than 3 months
- Landline Telephone Bill not older than 3 months
- Property Tax Receipt not older than 1 year
- Registered Rent or Lease Agreement
- Marriage Certificate issued by a government authority
- NREGS Job Card
- Caste or Domicile Certificate issued by State Government
The complete and updated list of accepted documents is available at uidai.gov.in under "List of Supporting Documents." UIDAI will reject a document if it is blurry, expired, incomplete, or not in the name of the Aadhaar holder.
Important: If the address proof document is not in your name such as an electricity bill in your landlord's name, UIDAI will not accept it. You must use a document that clearly shows your own name along with the new address.
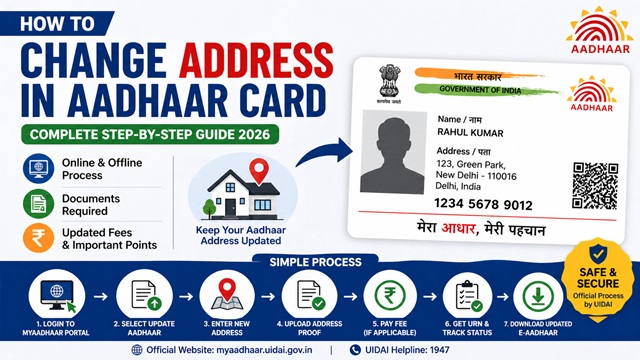
Method 1: Change Aadhaar Address Online via myAadhaar Portal
The online method is available only to residents whose mobile number is registered with Aadhaar. You receive an OTP on the registered number for login and verification. As per UIDAI, online address update is currently free until 14 June 2026 under a special provision. After that date, check the current fee at uidai.gov.in.
Step 1: Visit the myAadhaar Portal
Open your browser and go to myaadhaar.uidai.gov.in. This is the only official UIDAI portal for online Aadhaar updates. Do not use any third-party website.
Step 2: Log In with Your Aadhaar Number
Click on Login on the homepage. Enter your 12-digit Aadhaar number and the captcha code shown on screen. Click Send OTP. A 6-digit OTP is sent to your registered mobile number. Enter the OTP and click Login to access your Aadhaar dashboard.
Step 3: Select Update Aadhaar
On your dashboard, click on the Update Aadhaar option. This opens the update form where you can select which detail you want to change.
Step 4: Select Address as the Field to Update
On the update form, tick the checkbox next to Address. Click Proceed to Update Aadhaar to move to the next step.
Step 5: Enter Your New Address
Fill in your new address carefully in all required fields including house number, street, locality, city, district, state, and PIN code. Double check every field before proceeding. The address you enter must match the address on your supporting document exactly.
Step 6: Upload Your Address Proof Document
Upload a clear, coloured scan or photograph of your address proof document. UIDAI requires the upload to be in JPEG, PNG, or PDF format and not more than 2 MB in size. The image must be clear and fully readable. Blurry or incomplete images will be rejected.
Step 7: Submit Your Request
Review all the details carefully before submitting. Click Submit. After successful submission, UIDAI generates a Service Request Number (SRN) which is displayed on screen and also sent to your registered mobile number as an SMS. Download the invoice containing the SRN for your records. You use the SRN to track your update status.
Method 2: Change Aadhaar Address Offline at Enrolment Centre
Use this method if your mobile number is not registered with Aadhaar, or if you prefer visiting a centre in person. The fee for offline demographic update at an enrolment centre is Rs 75.
Step 1: Find the Nearest Aadhaar Enrolment Centre
Use the Bhuvan Aadhaar portal at bhuvan-app3.nrsc.gov.in/aadhaar to find authorised centres near you. Search by state, district, or pincode. The portal shows each centre's address, type, and working hours. You can also book an appointment in advance at appointments.uidai.gov.in/bookappointment.aspx.
Step 2: Visit the Centre with Your Documents
Carry your Aadhaar card (physical or printed e-Aadhaar) and your original Proof of Address document. The operator scans the original and returns it to you before you leave. You do not lose your original documents.
Step 3: Fill the Aadhaar Enrolment and Update Form
At the counter, collect the Aadhaar Enrolment and Update Form. You can also download and pre-fill it from uidai.gov.in before visiting to save time. Write your 12-digit Aadhaar number and fill in the new address. Tick the Address checkbox in the update section. Make sure every field is filled correctly and the address matches your document.
Step 4: Submit the Form and Document
Hand the completed form and original Proof of Address to the operator. The operator verifies your document, enters the details into UIDAI's system, and returns all original documents to you.
Step 5: Complete Biometric Verification
The operator captures your fingerprints or iris scan to confirm your identity. This biometric check is mandatory for all demographic updates at enrolment centres.
Step 6: Pay the Fee
Pay Rs 75 at the counter. If you are also doing a biometric update such as photo or fingerprints in the same visit, the Rs 75 demographic update charge is waived and you pay only Rs 125 for the biometric update. Always collect your payment receipt.
Step 7: Collect Your Acknowledgement Slip with URN
After submission, the operator gives you an acknowledgement slip containing your Update Request Number (URN). Keep this slip. You use the URN to track the status of your address update. The applicable charges are also printed on this slip.
Method 3: Update Address Without Address Proof Using Address Validation Letter
UIDAI provides an Address Validation Letter facility for residents who do not have a valid Proof of Address document but have a mobile number registered with Aadhaar. This method allows you to verify your address without submitting a standard document.
How the Address Validation Letter Process Works
- Log in to myaadhaar.uidai.gov.in with your Aadhaar number and OTP
- Click on Update Address and then select the Address Validation Letter option
- Enter the new address you want to update
- UIDAI posts a letter containing a secret code to the address you entered
- Once you receive the letter, log back in to the myAadhaar portal
- Enter the secret code from the letter to verify that you actually live at that address
- UIDAI then updates your address in Aadhaar after verifying the secret code
This method is useful for residents living in rented accommodation without a document in their name, new residents at an address, and people who do not have utility bills or other standard documents for the new address. This method is currently free until 14 June 2026.
How to Track Aadhaar Address Update Status
After submitting your request through either method, you can track its progress at any time.
- Visit myaadhaar.uidai.gov.in
- Click on Check Aadhaar Update Status
- Enter your Aadhaar number and the SRN (for online submissions) or URN (for offline centre submissions)
- Enter the captcha and click Check Status
- The portal shows whether your request is under review, in process, approved, or rejected
You can also check via SMS. Send UID STATUS followed by your SRN or URN to 51969 from your registered mobile number.
As per UIDAI, 90% of update requests are completed within 30 days. You will receive an SMS on your registered mobile number once the update is successfully processed.
Current Fee for Aadhaar Address Update (2026)
| Service | Current Fee | Notes |
|---|---|---|
| Online address update via myAadhaar portal | Free (until 14 June 2026) | Special provision currently in effect as per UIDAI |
| Address Validation Letter method via myAadhaar portal | Free (until 14 June 2026) | For residents without valid address proof |
| Offline demographic update at enrolment centre | Rs 75 | Per request when done separately at centre |
| Demographic update done with biometric update in same visit | Free | Rs 75 charge is waived when done with biometric update |
| Aadhaar PVC Card order after address update | Rs 50 | Optional, ordered online at myaadhaar.uidai.gov.in |
Always check the current fee at uidai.gov.in before visiting a centre as UIDAI may revise charges. The applicable charges are also displayed at the enrolment centre notice board and printed on the acknowledgement slip.
How to Download Updated Aadhaar After Address Change
Once UIDAI confirms your address update via SMS, download your updated e-Aadhaar from the UIDAI portal. Always download after you receive the confirmation SMS. If you download before the update is processed, the old address will still appear in the PDF.
- Visit myaadhaar.uidai.gov.in/genricDownloadAadhaar
- Enter your 12-digit Aadhaar number or VID or EID
- Complete the captcha and click Send OTP
- Enter the OTP received on your registered mobile number
- Click Download and your updated e-Aadhaar PDF downloads immediately
The downloaded PDF is password-protected. The password is the first four letters of your name in CAPITAL letters followed by your 4-digit birth year. Example: Name RAHUL, Year 1995, password is RAHU1995. Name P. KUMAR, Year 1990, password is P.KU1990. You need Adobe Reader to open the file correctly.
The e-Aadhaar is legally valid for all purposes including KYC, identity proof, banking, and government services. You do not need a physical card.
If you want a physical card with the updated address, order an Aadhaar PVC Card for Rs 50 from myaadhaar.uidai.gov.in. India Post delivers it to your updated registered address.
What Happens After Aadhaar Address is Updated
Once your address update is approved and processed by UIDAI, the following happens automatically:
- Your new address becomes live in UIDAI's database and reflects in all Aadhaar authentication and eKYC services
- You receive an SMS confirmation on your registered mobile number
- UIDAI dispatches a new Aadhaar letter to your updated address by post. As per UIDAI, the Aadhaar letter with updates is delivered only to the address recorded in Aadhaar after the update is processed
- You can immediately download the updated e-Aadhaar from myaadhaar.uidai.gov.in
Reasons Why Aadhaar Address Update May Be Rejected
UIDAI may reject your address update request for any of the following reasons:
- The Proof of Address document submitted is not in UIDAI's accepted list
- The name on the document does not match the name recorded in your Aadhaar
- The address entered in the form does not match the address on the submitted document
- The uploaded document image is blurry, incomplete, or not a coloured scan of the original
- The document submitted is expired, for example a utility bill older than 3 months
- The document appears tampered or altered
If your request is rejected, UIDAI sends the reason to your registered mobile number. Review the reason, correct the issue, and resubmit the request. Each resubmission attracts a fresh fee of Rs 75 at the centre, or is free online until 14 June 2026.
Things to Keep in Mind
- There is no lifetime limit on Aadhaar address updates. You can update your address as many times as required when you move.
- Always use only the official UIDAI portal at myaadhaar.uidai.gov.in for online updates. Never use third-party websites.
- The address you enter must exactly match the address on your supporting document. Even minor discrepancies can lead to rejection.
- For online updates, the document image must be a clear coloured scan of the original. Black and white scans or photographs of photocopies are not accepted.
- Online update generates an SRN. Offline centre update generates a URN. Do not confuse these two numbers. Both are used for tracking but through different reference fields on the status check portal.
- Your Aadhaar number never changes after an address update.
- Download the updated e-Aadhaar only after you receive the SMS confirmation. Downloading before confirmation will show the old address.
- If your registered mobile number is not active, you cannot use the online method. Visit an enrolment centre instead.
- Never share your OTP or Aadhaar details with any third-party agent or website claiming to help update your address.
Conclusion
Changing your address in Aadhaar is a straightforward process. If you have a registered mobile number and a valid Proof of Address document, use the online method at myaadhaar.uidai.gov.in, it is currently free until 14 June 2026. If you do not have a registered mobile number, visit any Aadhaar Enrolment Centre with your document and pay Rs 75. If you have no document at all, use the Address Validation Letter method on the myAadhaar portal.
Track your request using the SRN or URN at myaadhaar.uidai.gov.in. Once the SMS confirmation arrives, download the updated e-Aadhaar immediately. Always use only official UIDAI platforms and never share your Aadhaar details with unauthorised agents.
For any queries, call the UIDAI toll-free helpline at 1947 or email help@uidai.gov.in.
Add new comment